myTifi uses Wifi (or WLAN) to control your Samsung TV. This is not available on all models, since it requires a network connection and Smart TV features. To control your TV with your iPhone or iPad, both your TV and iOS device should be connected to the same router in your home network. The TV can be connected via a cable (LAN), or wireless via Wifi (WLAN). Your iOS device always connects via Wifi (WLAN).
IMPORTANT: Always make sure that your TV and iOS device are connected to the same network, otherwise myTifi can’t see the TV.
Compatbile TV models
Your Samsung TV needs to have the proper features onboard, to be remote controlled by myTifi. This table lists the required features per Series, and the most common incompatible TV models:
The majority of users own a F-Series or higher TV. To know which TV model you have, read here.
It’s important to understand that not all models within a Series are supported, as indicated in the last column. If your H or J-Series TV doesn’t show a PIN code when myTifi requests for it, your TV is not compatible. Read more. For example an F4000 is not compatible, since it has ConnectShare instead of AllShare. The F4500 is compatible, since it has Smart TV + AllShare. If your TV is not compatible, please note this is not a limitation of myTifi, but a limited feature set of your Samsung TV.
Retrieve your TV model
You can retrieve your TV model in 2 ways:
At the rear panel of the TV is a sticker, which contains the Model code and Type No. For example: Model code = UE37D6300TSXXN Type No. = UE37D6300 In this case it’s a D-Series TV.
Read the model from the TV menu. Do the following with the original infrared remote:
Switch on your Samsung TV.
Press the button Menu on your remote.
Use the arrow down button, to select “Support” from the menu.
Press the button Enter.
Select the button “Contact Samsung” and press the button Enter.
This will show a screen with information, among it is a row with “Model Code”. If you don’t see this, use the arrow down or right button to show the next page.
The name after it, is your TV model. E.g. UE37D6300, which is a D-Series.
Use with K-Series, M-Series, N-Series, R-Series, T-Series, A-Series, B-Series, C-Series, OLED and QLED
Since the K-Series from model year 2016, all Samsung TVs have the same connection procedure. The 2021 models and higher require myTifi version 8.33.0 or higher. Make sure that your TV and iOS device are connected to the same network, otherwise myTifi can’t see the TV. Although this seems obvious, occasionally an iOS device might connect to another known network (e.g. the neighbours), while your TV is connected to your own network.
Switch on your TV and make sure it is connected with your Router. Detailed instruction videos on how to do this (wireless or wired) can be found here.
Connect your device via Wifi with the same network your TV is connected to.
Start myTifi.
It will search for your TV automatically, this can take up until 5 seconds.
The TV Manager will show all your detected Samsung TVs. Tap a TV to establish the connection.
If your TV is found for the first time, a confirmation window is shown on your TV. In case it requests confirmation each time read here.
Approve myTifi on your TV. This has to be done only once, your TV will store myTifi as an approved remote device. Note: If you use myTifi on multiple iOS devices, each device has to be approved once on your TV.
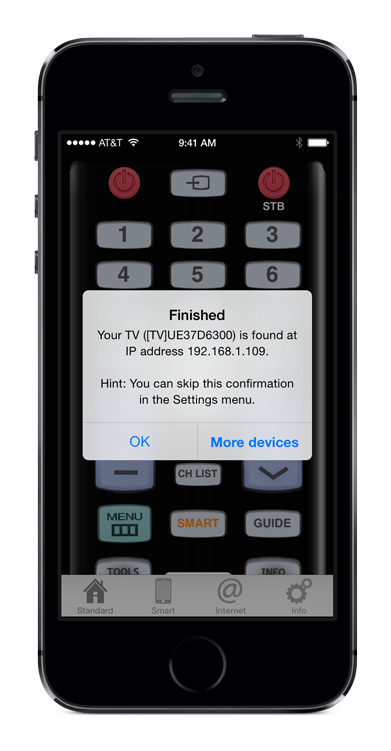
myTifi will show a confirmation that it’s connected successfully with your TV:
Now you can remote control your TV with myTifi.
If you have multiple Samsung Smart TV’s in your network, you can press the button “More Devices”. More info on using multiple TVs.
Make sure that your TV and iOS device are connected to the same network, otherwise myTifi can’t see the TV. Although this seems obvious, occasionally an iOS device might connect to another known network (e.g. the neighbours), while your TV is connected to your own network.
Switch on your TV and make sure it is connected with your Router. Detailed instruction videos on how to do this (wireless or wired) can be found here.
Connect your device via Wifi with the same network your TV is connected to.
Start myTifi.
It will search for your TV automatically, this can take up until 5 seconds.
The TV Manager will show all your detected Samsung TVs. Tap a TV to establish the connection.
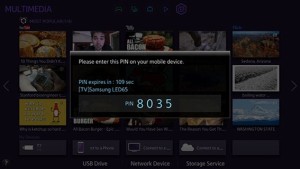
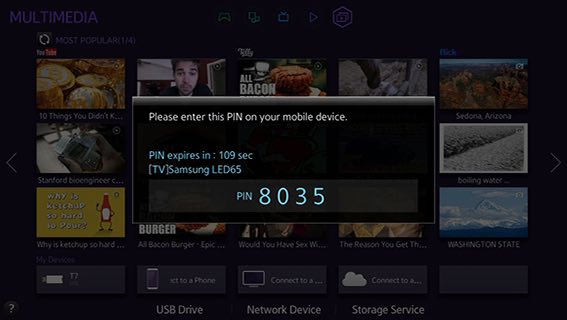
If your TV is found for the first time, a PIN code is shown on your TV:
Note that this PIN is a random number generated by the TV and has no relation with the Security PIN that is optional in the TV menu. If your TV doesn’t show a PIN code, read here.
Enter the PIN code in myTifi. This has to be done only once, your TV and myTifi will both store the PIN code. Important: myTifi version 7.13.0 or higher is required. Older versions will show “Authentication failed”. Version 7.13.0 is released in January 2018 and requires iOS 9.3 or higher. Hence it supports: * iPhone 4s and later * all iPads, except 1st generation * iPod touch 5th generation and later
Note: If you use myTifi on multiple iOS devices, each device has to be approved once on your TV.
When myTifi accepts the PIN code, it will start the authorization on the TV. This might take up to 30 seconds. If authorization fails, the TV will show a new PIN code.
myTifi will show a confirmation that it’s connected successfully with your TV:
Now you can remote control your TV with myTifi.
If you have multiple Samsung Smart TV’s in your network, you can press the button “More Devices”. More info on using multiple TVs.
Make sure that your TV and iOS device are connected to the same network, otherwise myTifi can’t see the TV. Although this seems obvious, occasionally an iOS device might connect to another known network (e.g. the neighbours), while your TV is connected to your own network.
Switch on your TV and make sure it is connected with your Router. Detailed instruction videos on how to do this (wireless or wired) can be found here.
Supported TVs have an option to receive remote control signals over the network, which is enabled by default. You can verify that this option is enabled.
Connect your device via Wifi with the same network your TV is connected to.
Start myTifi.
It will search for your TV automatically, this can take up until 5 seconds.
The TV Manager will show all your detected Samsung TVs. Tap a TV to establish the connection.
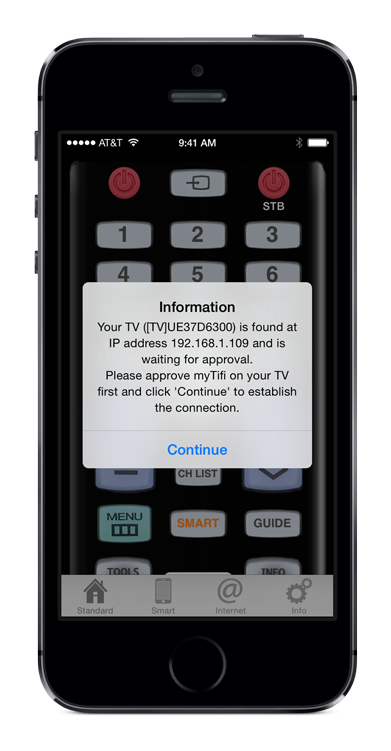
If your TV is found for the first time, a confirmation window is shown on your TV:
Approve myTifi on your TV. This has to be done only once, your TV will store myTifi as an approved remote device. Note: If you use myTifi on multiple iOS devices, each device has to be approved once on your TV.
After approval on your TV, press the button “Continue” in myTifi:
myTifi will show a confirmation that it’s connected successfully with your TV: If your device shows the following message, you did deny it instead of approve. See the trouble-shooting section to approve it manually.
Now you can remote control your TV with myTifi.
If you have multiple Samsung Smart TV’s in your network, you can press the button “More Devices”. More info on using multiple TVs.
IMPORTANT The B-Series from 2009 are discontinued since myTifi version 5.4.0.
For B-Series from 2009 it is required to:
Use myTifi 5.3.1 or a previous version.
Run the application SamyGo “Remote Lan Control”, that can be found on the SamyGo Project pages.
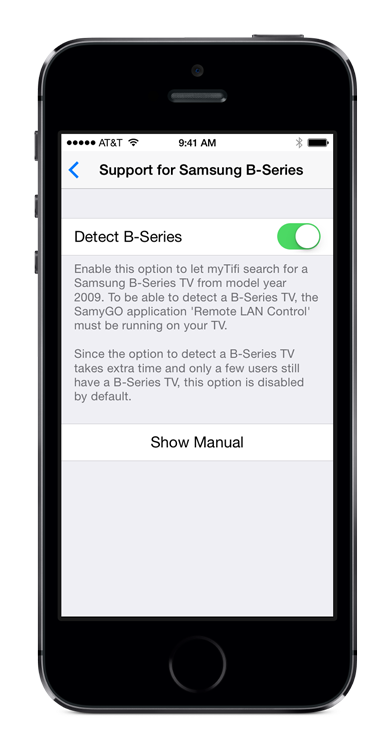
Enable Support for B-Series in the Settings of myTifi. Go to the tab “More”, press “Settings”. Select “Support for Samsung B-Series” from the section TV and enable the toggle for “Detect B-Series”:
Even if the described approach is not very dangerous because the TV resets to its initial state after a restart, iMKapps is not responsible for any damages on your TV. Do it on your own risk.
Follow these steps to install and run it, before starting myTifi:
Download the SamyGo application “Remote Lan Control”.
Extract the zip-file and copy the content to a USB-stick that is formatted in FAT32.
Plug the USB-stick into your TV;
If your TV is already turned on, a window should pop up after a little while. Select “Content Library”.
If your TV was turned off or no window is shown, press the button “CONTENT” on your remote.
Press the LEFT arrow button several times, to select “Content Management” and press the ENTER-button.
Select USB and press the ENTER-button.
Select your USB stick and press ENTER.
Select the “Games” entry and press the ENTER-Button. Some users reported that there was no Games section. In this case you could try to create one. This requires telnet enabled and is explained here.
You should see a list of applications which are installed on your USB-stick. Highlight “SamyGO Remote” and press the ENTER-Button.
A menu appears where you can run (“Play”) the application. You can also copy the application to the TVs internal storage so that you don’t have to plug in your USB-stick every time you want to run the application. If you see a message “Not available” you have to downgrade your firmware. The latest firmware update from Samsung removed the possibility to load extensions like this. How to downgrade the firmware is explained here.
Select “Play” and press ENTER.
If you run the application there is NO feedback. Anyway – the server should be running now.
Quit the content manager, by pressing EXIT button twice, or just the TV button.
Connect your device via Wifi with the same network your TV is connected to.
Start myTifi.
It will search for your TV automatically, this can take up until 10 seconds.
If your TV is found, the IP Address of your TV is shown. If it doesn’t find your TV, go to the tab “More”, press “Settings”. Select “Support for Samsung B-Series” from the section TV and ensure that the toggle for “Detect B-Series” is enabled.
Minor flaw: The server (SamyGo “Remote Lan Control”) on your TV has to be restarted every time you switch off your TV. There is no simple solution yet.
Use myTifi with multiple TVs
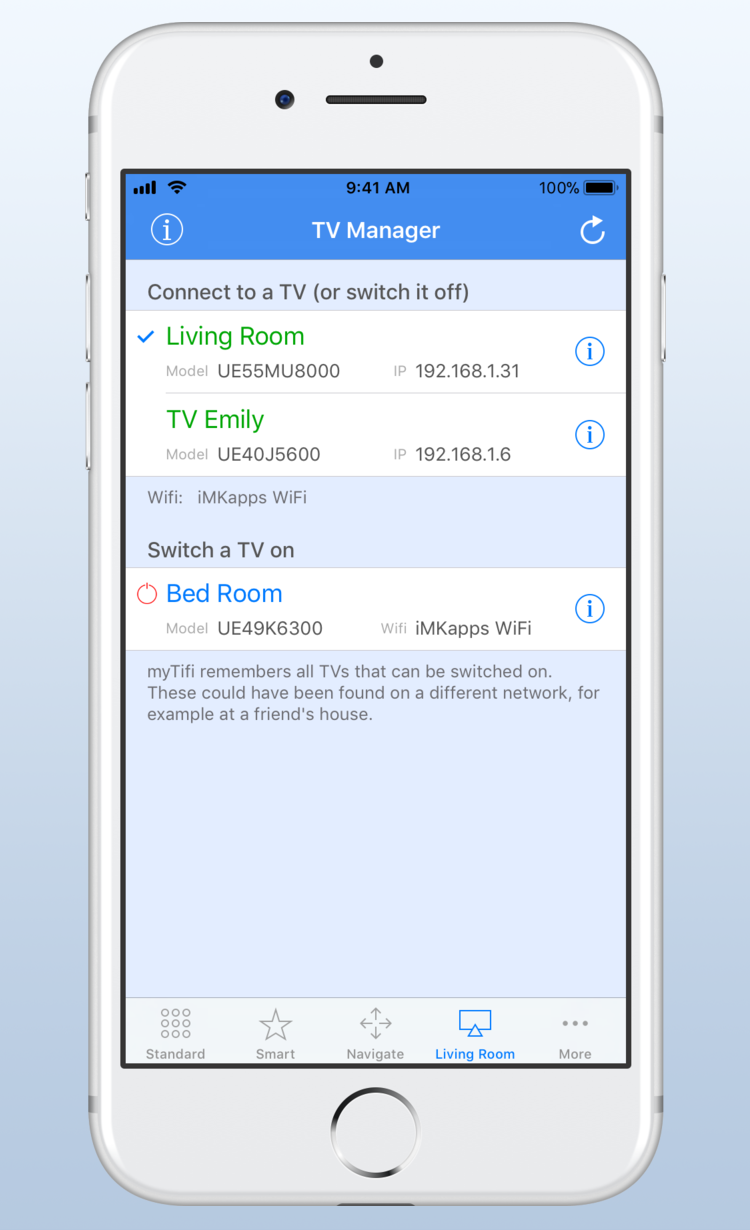
In version 8.0.0 we introduced the TV Manager to easily use myTifi with multiple TVs:
The top section shows all TV names in green of TVs that are switched on. Just select a TV to connect with it; a checkmark is placed before the TV that’s connected. For convenience, the connected TV name is shown on the Tab bar. Tap the current connected TV to switch it off.
If your TV is not listed, press the refresh button (in the top right corner) to scan again. Or pull to refresh.
The bottom section shows TVs that can be switched on (the K-Series or later) and are currently not found. These can be indicated by the blue name and red standby icon. Tap a TV to switch it on.
Manually connect to a fixed IP address
Limitation: This feature is not robust on the F-Series, so it’s recommended to not use this on the F-Series.
For several reasons it’s possible to configure myTifi to always connect to the same TV by configuring the IP address of this TV:
It’s faster. myTifi doesn’t have to discover all devices on your network, it instantly connects to the dedicated IP address of your TV.
You have multiple Samsung Smart devices connected to your network, but always want to control the same device.
Some networks don’t support the UPnP protocol, so the automatic TV discovery will fail due to a lack of response.
Control your TV via a 3G/4G connection by using a VPN connection.
Some network configurations confuse myTifi, which makes it impossible to discover a TV correctly.
IMPORTANT: If you configure to use a fixed IP address, ensure that you have configured your TV to also use a fixed IP address. By default, the TV’s network is configured in automatic mode. This means that at every startup of the TV get’s an IP address assigned. This IP might change from time to time. With the result that myTifi can’t find the TV anymore, since it does have a different IP address configured.
You can do this in the Settings menu on the tab “More”:
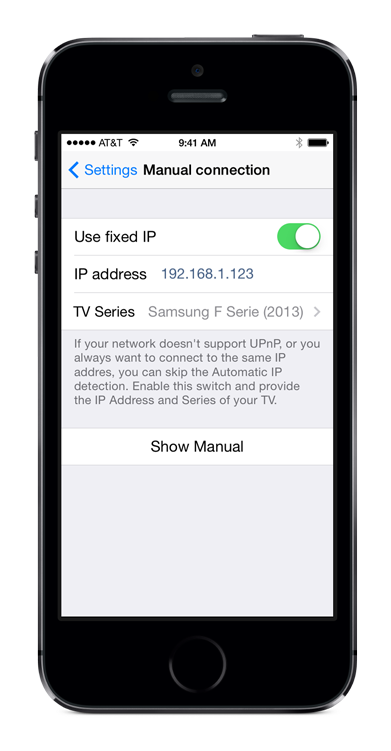
Scroll to the section “General” and select “Manual connection & VPN”.
Enable option “Use fixed IP”. This shows 2 new settings.
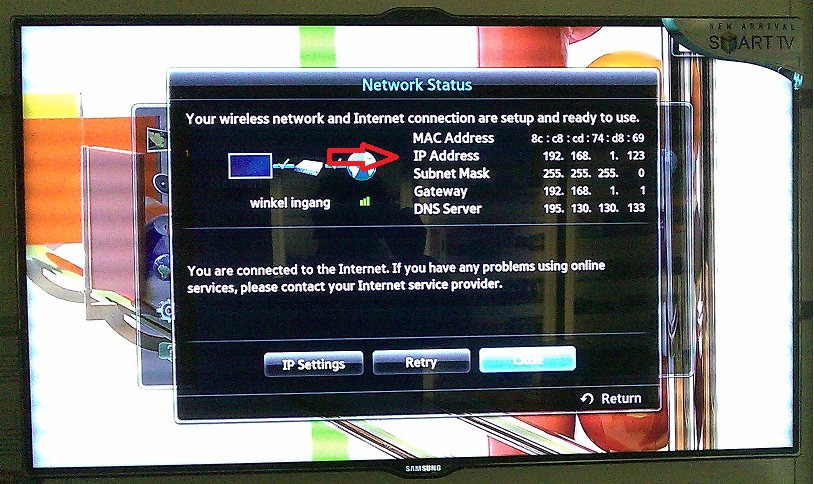
Enter the correct IP address of your TV (note that 192.168.0.0 is just a placeholder). You can find the IP address in your TV’s menu, under “Network” -> “Network status”:
Press the back button “Settings” in the top left corner.
Press Done to save the changes.
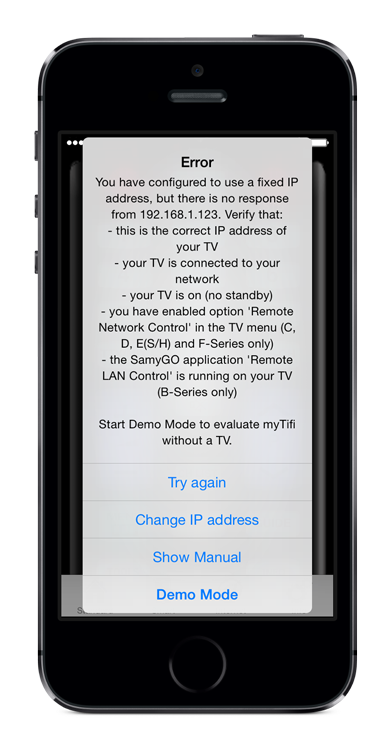
From now on myTifi will skip the UPNP discovery and connect directly to this IP address. If the TV is not turned on or the TV’s IP address has changed, myTifi will throw an error referring to this IP address:
In this case make sure that your TV is turned on and has the same IP address that you configured in myTifi.
Trouble-shooting connection issues
We’ll provide tips and tricks to solve the most common connection issues.
No devices can be found
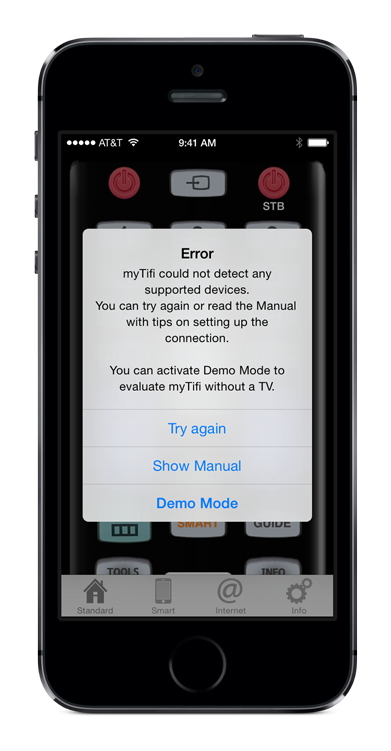
If myTifi can not find your TV with automatic detection, it will show the following message:
Our code works really strait-forward. myTifi just shouts on your network “Are there any Samsung Smart devices?” and waits 5 seconds for response(s).
This code does’t change overnight. So if you experience connection issues every now and then, it’s not related to our product, but probably to your network setup.
If myTifi receives no response, then there are no switched on Samsung Smart devices on the network that myTifi is connected to. Perform the following steps to solve connection issues. The first 5 (highlighted in green) cover 99% of ALL connection issues that are reported to us:
Reset your router to renew the IP address of your TV. Just unplug the power cord, wait 1 minute and reconnect the power cord. Also do this for other netwerk infrastructure devices, such as switches, Wifi repeaters, etc.
Ensure that your Samsung Smart TV is switched on. Even TVs that support the switch on function, must have been connected successfully once, before this feature works.
Ensure that your iOS device is connected to the same Wifi network as your Samsung Smart TV. This might sound obvious, but please read carefully.
For example you’re connected to your neighbours acces point, or a free wifi spot that cable providers are currently implementing in cable modems.
You won’t notice this while all your internet connected apps are still working, since those access points provide internet access.
However, in order to connect to a specific device (e.g. Smart TV) on your private network, it’s required to have your iOS device connected to that specific access point.
Wifi guest networks won’t work; they only provide an internet connection, but block all all other internal network traffic.So you can’t connect to a Smart TV via a guest network connection.
You can check the access point on your iOS device in de iOS Settings App.
Multi-band routers: Not all multi-band routers (e.g. with 2.4 and 5 GHz antennas) link network traffic between bands. So both your TV and iOS device should be on the same band.
Also check if your TV is properly connected to the internet. In your TV menu, go to Network -> Network Status
In the TV menu, go to “Network” -> “Network Status” to reconnect to your router and get a renewed IP Address. If this doesn’t help, unplug the power cord of your TV, wait 1 minute and reconnect the power cord.
Ensure that your TV has the latest software. In the TV menu, go to “Support” -> “Software Update”.
Force quit myTifi app: Double-click the Home button, swipe horizontally to select myTifi and swipe myTifi vertically out of the screen.
Ensure that your mobile device is listed as Accepted in the TV menu, and not Blocked or Denied. Depending on your TV model, this is located in the Menu at:
Remove your mobile device from the device list in the TV menu. See the table at the previous topic for the location of the device list in the Menu.
Wait 30 seconds and retry again. Especially the E(S/H) Series might send the message “Remote control not supported”, during the first 20-40 seconds after switching on the TV.
If you have enabled the option to use a manual connection, ensure that your TV has still the same IP Address as you have configured in the Settings of myTifi. Your TV might get a different IP Address at every startup.
Verify that UPNP is enabled in your Router settings.
Switch your TV off, and on again. Sometimes the TV doesn’t broadcast the required messages that myTifi expects.
A non-supported device is found
<todo>
Your device is denied, approve it
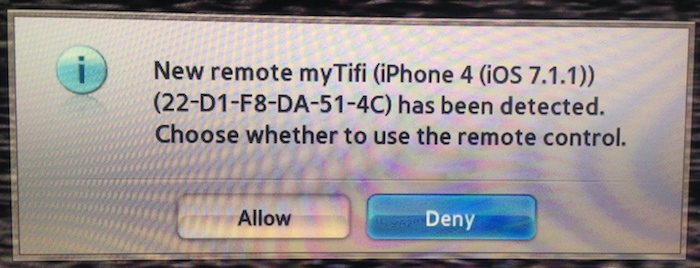
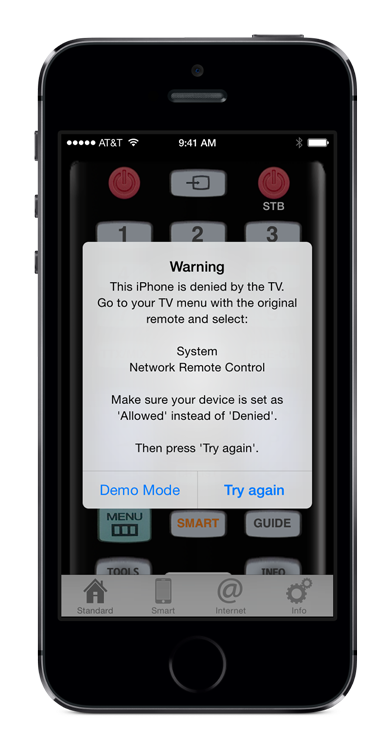
When you connect your device for the first time with the TV, the TV asks for approval:
If you (accidentally) did press the DENY button, myTifi wil show the following warning each time you want to connect:
To solve this, you have to approve myTifi manually in your TV menu:
Switch on your Samsung TV.
Press the button MENU on your remote.
Use the arrow down button, to select “System”* from the menu. * The most common translations:
Select the button “Network Remote Control”* and press the button ENTER. NOTE: If there is no such menu entry, go back to the main Menu, and select “Network”. Press the button ENTER. Select the button “AllShare” and press the button ENTER.
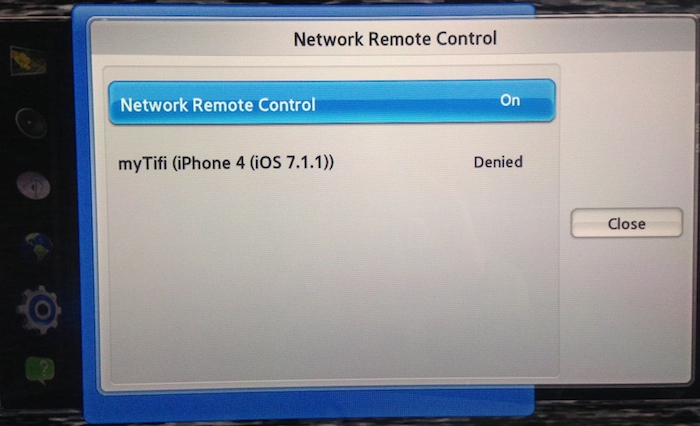
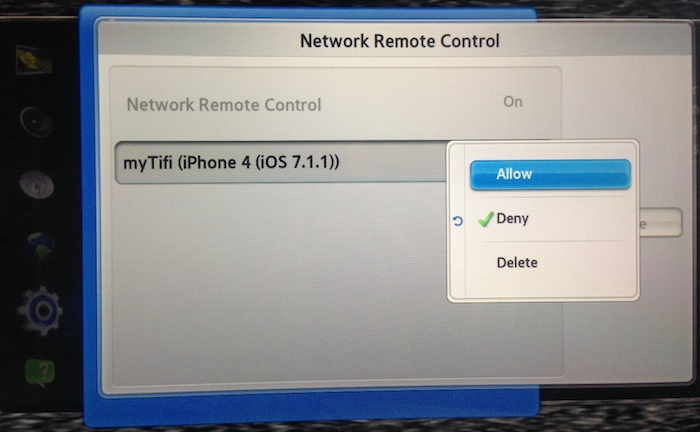
A list of remote devices is shown:
Select your device from the list, press the button ENTER and select “Allow”:
Press Enter again to save the change.
Exit the TV menu.
Enable Network Remote Control
Compatible Samsung TVs have an option to receive remote control signals over the network, which is enabled by default. This option is called “Network Remote Control”. This instruction shows how you can find this option in your TV menu and enable it:
Switch on your Samsung TV.
Press the button MENU on your remote.
Use the arrow down button, to select “System”* from the menu. * The most common translations:
Select the button “Network Remote Control”* and press the button ENTER. NOTE: If there is no such menu entry, go back to the main Menu, and select “Network”. Press the button ENTER. Select the button “AllShare” and press the button ENTER.If this menu is also not present, your TV is does not support the Network Remote Control feature. See the list of compatible TV models.
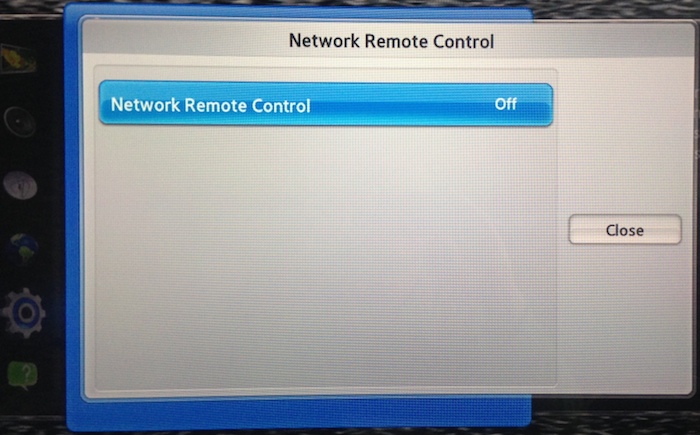
The settings for Network Remote Control are shown:
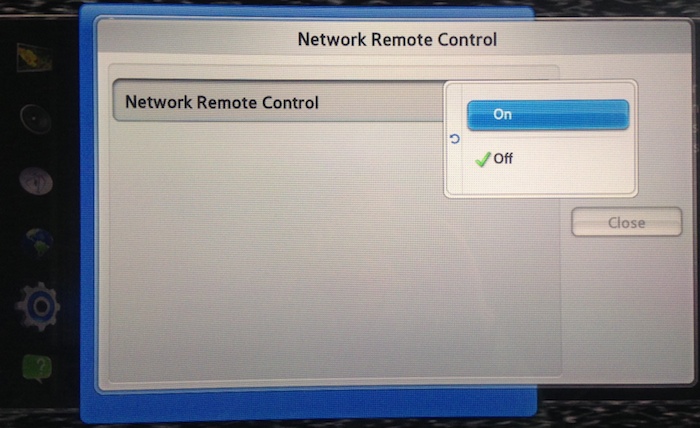
If the feature is disabled, select it and press the button ENTER and select “On”:
If your TV doesn’t show a PIN code, your TV is probably not compatible. These are TVs like J5200, J5300, J5205, J6203, J620D, etc. See the list of compatible models.
These are mid-range Smart TVs which are build with less powerful hardware. Therefor it’s not capable anymore to run all software features. As a result the feature for remote network control is disabled by Samsung. Please note that this is not a limitation of myTifi, but a limited feature set of your Samsung TV.
J6200
We receive a lot of complaints that the North American model of the J6200 TV (UNxxJ6200) doesn’t show a PIN code. Analysis of these TVs shows that the TV contains firmware of the European J6203.
The J6203 is a mid-range Smart TV which is build with less powerful hardware. Therefor it’s not capable to run all software features. As a result the feature for remote network control is disabled by Samsung. Please note that this is not a limitation of myTifi, but a limited feature set of your Samsung TV.
TV requests approval every time myTifi connects
This can occur with the K-Series or later due to a new Menu setting, or when you have installed the Facebook app on your iPhone or iPad.
The solution with the TV Menu:
In the TV Menu browse to the Device Manager. Depending of your TV Series, this is located at:
There is a setting “Access Notification” which might be set to “Always On” or “Only First Time”.
Change this to “Off”.
The solution with the Facebook App:
As indicated in this support article from Samsung the Facebook app (while running in the background on your iPhone) is continuously scanning your local network for devices to … gather data. Samsung suggests to (force) close the Facebook app to stop this, which is inconvenient. Luckily one of our users found a decent solution, which also resolves this privacy issue of the Facebook app permanently: disable Local Network Access for the Facebook app. Please read this support article from Apple how to do this.
Control your TV
Once connected, myTifi can be used to control your TV.
Use myTifi with a cable Set Top Box (STB)
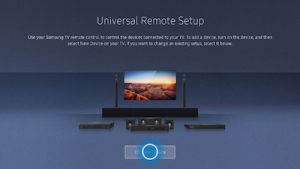
When you use a Set Top Box (STB) from your cable provider to watch television, you can’t change channels directly with myTifi. Fortunately Samsung provides a solution for many1 of their TV models: Universal Remote. This Universal Remote feature in the TV menu will allow you to control other devices, like your STB or sound system, with the original Samsung TV remote.
When Universal Remote is configured properly in the TV, myTifi can control these devices too: switching channels, changing sound volume, etc. 👍
1 This function is not available on certain models and/or in specific geographical areas.
Background The STB is connected to an HDMI source of the TV and the TV just acts as a display. The built-in TV tuner of the TV is not used, which is normally controlled by the numeric and P+ and P- buttons of the original Samsung infrared remote, or by myTifi. Switching channels is done by the infrared remote of your STB. The Samsung Universal Remote feature solves this by sending the proper infrared commands to the external devices. It has a database of all the infrared commands for a wide range of STBs, sound bars and home theaters. During the setup, you define which devices are connected to the TV. The TV retrieves the matching infrared codes for these devices and will send them to the devices. This is done either via a free IR Extender (F-Series or H-Series) or Smart remote (J-Series and higher). TIP: When the TV doesn’t list your provider or device, you can enter it manually. For example ‘T-Mobile’ as provider and ‘Entone’ as brand for their STB.
J-Series and higher
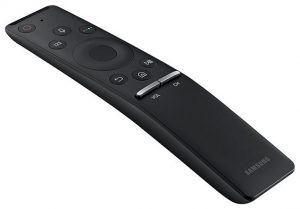
The Universal Remote feature works in combination with the Samsung Smart remote. This is a remote with a small set of buttons, which is paired via Bluetooth to your TV. It was often shipped as a second remote to the regular infrared remote, but can also be the only remote in the TV box. Possible model codes (which can be found within the battery compartment) are: BN59-01265A, BN59-01266A, BN59-01292A, BN59-01278A.
When myTifi sends a control command to the TV, the Universal Remote feature in the TV relays the command via Bluetooth to the Smart remote. This will convert the control command to the proper infrared command and send it to your devices. Therefor it’s essential that the Smart remote has a clear line of sight to these devices.
For more information on configuring the Universal Remote feature with the Smart remote, see the instructions from Samsung for the J-Series, K-Series, M-Series or QLED.
E-Series, F-Series or H-Series
With some of the E-Series (2012), and all of the F-Series of model year 2013 and H-Series of 2014, Samsung shipped a nifty IR Extender in the box. Together with the Universal Remote feature in the TV menu, this will convert the received control commands from myTifi to the proper infrared commands for your other devices.
For more information on configuring the Universal Remote feature with the IR Extender, see the instruction videos from Samsung for the E-Series, F-Series or H-Series.
TIP: When the cable of the IR Extender is too short for your setup, you can extend it with a common (and cheap) audio cable with a 3.5 mm (1/8″) stereo TRS connector. This connector is more commonly known as the Headphone Jack on portable MP3 players and mobile phones. The cable should have a male 3.5 mm stereo (TRS) plug on one end and a female 3.5 mm stereo (TRS) jack on the other end.
Use the Standard tab
The Standard tab is similar to the original Samsung infrared remote. myTifi contains more than 70 different remote layouts. You can select your remote from the Settings menu.
If your remote is not present, please send us an email with the number of your remote.
Additional features:
The button Source will present the Smart Source overlay, to directly select a source.
When you keep a numeric button pressed for 450 ms, myTifi will automatically send an ENTER command to directly switch channel. Normally the TV wait several seconds to allow you to enter more digits.
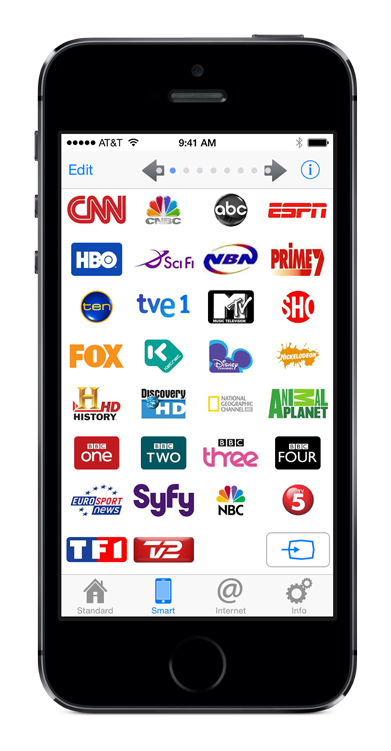
Use the Smart tab
The Smart tab brings you a new way of controlling your TV. It contains 240 configurable Smart Channel buttons to easily switch between your favourite channels. Press a button to send the matching channel number to the TV.
Swipe gestures are used to change the volume or channel:
swipe horizontally with 1 finger to change the channel
swipe vertically with 1 finger to change the sound volume
keep your finger on the screen at the end of the swipe gesture, to send the command to the TV continuously, until you release your finger. This let’s you quickly change channels or the volume.
double-tap anywhere on the screen to mute or unmute the sound.
The Smart Channel buttons are divided over multiple pages. To navigate between them, you can use the left and right grey arrows, or swipe vertically with 2 fingers.
Configure a Smart Channel button
Important The idea behind the Smart Channels is the same as your bookmarks or favourites in your internet browser; it’s a selection of your favourite TV networks. For each of the 240 buttons it’s possible to configure the channel number. So even if you have 900 channels, you can assign channel 900 to button number 1.
It’s easy to configure a Smart Channel button:
Keep a button pressed for 1 to 2 seconds.
All buttons start to dance.
Select the dancing button that you want to edit.
A configuration screen will appear:
Change the channel number of the network to that matches with your TV or STB.
Change the network name. Examples: cnn, bbc, syfy, nbc hd, etc.
After entering a network name, the network logo is searched on the internet.
Select a network logo. A preview is shown behind the button “Search”. If you want to delete a logo, just tap the preview logo above the button “Search” and press “Delete logo” from the popup.
Press the button “Save” to store your settings and return to the Smart screen.
When you’re done, press the Done button in the top left corner to leave edit mode.
If you want to delete a button, just tap the red cross on the dancing button.
Backup or re-use Smart Channel settings on multiple iOS devices
We have implemented iCloud integration to automatically backup and sync your personal settings between multiple iOS devices, like your Smart Channel configurations. This will only sync your settings to devices that use the same iCloud account (i.e. Apple ID).
When you use different Apple IDs, you can manually download the Smart Channel logos and configuration from a device via iTunes File Sharing (requires myTifi 6.5.0 and higher). These files can then be copied to other devices. For detailed instructions on how to use iTunes File Sharing, we refer to the Apple documentation. Important In section ‘Copy files from an iOS app to your computer‘ select all the files that start with “smart” (incl. the file “smartChannelData-Vx.plist“). Do NOT select the file “purchase record.plist” or any of the folders.
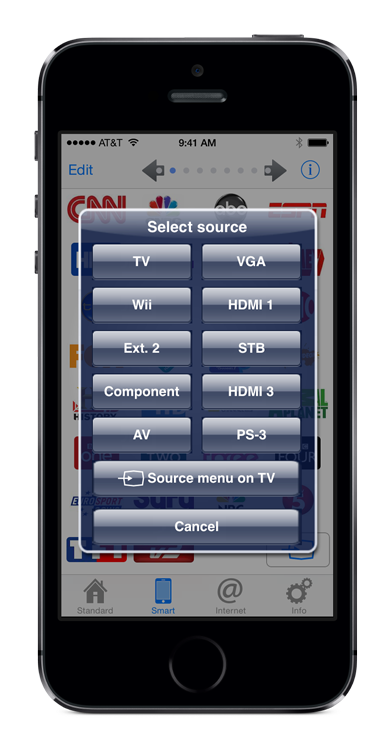
Smart Source
Smart Source is a feature which doesn’t exist on the original Samsung remote. It allows you to directly switch to one of the many input sources of your TV. Why should you remember that your STB is connected to HDMI-2, and your Play Station 3 to HDMI-4? Simply give the sources these names:
The Smart Source overlay will be shown when pressing the button Source on the Standard and Smart tabs.
Limitations
Smart Source is only available during the evaluation period and in the Full Version.
Samsung doesn’t provide direct control to the USB ports.
Smart Source is available up until model year 2015, the J-Series. Unfortunately Samsung removed this feature from their 2016 and recent models.
Use the Navigate tab
The Navigate tab provides a Touchpad and the most used buttons when operating the Smart Hub.
Use the iPhone/iPad keyboard to enter text
Text input is only available in the Smart Hub apps which support the Samsung onscreen keyboard (like the Web browser). It also works great in the SEARCH option, which shows results from Youtube (read below). Proceed as follows:
Since version 5.2.0, myTifi will automatically show the iOS keyboard when the TV system keyboard appears.
Enter your text in the textfield in myTifi.
Press the Send key on the iOS keyboard; the complete text will be send instantly to your TV (so not letter by letter what some users expect)
That’s it.
IMPORTANT
Some services, like Netflix and YouTube, have their own keyboards and do not support remote text input.
For Youtube, there is a nice work-around; use the SEARCH button, available on the Keyboard tab in myTifi.
This will open the TV’s search engine and myTifi will automatically show the iOS keyboard when the TV system keyboard appears.
The search results will primarily show Youtube videos. Just select them and the TV will open the Youtube app.
The best part, as introduced on the K-Series, even when the Youtube app is playing your video, you can press the SEARCH button again to make a new search.
Pressing CANCEL on the keyboard input in myTifi (or RETURN on the TV Search Engine) will automatically resume the Youtube video.
Control the mouse pointer in the web browser
In version 7.0.0 we have added a Touchpad.
You can control the pointer in the web browser with your finger and use it to navigate other screens. Tap on the Touchpad to click.
Premium features
You can evaluate myTif for freewith all features. After 25 starts, the evaluation period expires and some limitations will apply. After this period, the standard remote will still function to control your TV. The Premium features can be unlocked by a one-time purchase. The actual price in your local currency will be displayed in myTifi.
Comparison between Standard and Premium version
You can evaluate myTif for free with all features. After 25 starts, the evaluation period expires and some limitations will apply. The following table compares the features between the Standard and Premium version. Note that during the evaluation period, all Premium features can be used.
Paying is never fun. But when that’s behind, you can fully enjoy all functionalities of myTifi.
We use Apple’s In-App Purchase to become a Premium user. The purchase is stored securely on the iOS device itself.
Tip: If you became a Premium user in the past, but myTifi works as the standard version, you can restore your purchasefor free.
To get the Premium features, you need to press the button “Become a Premium user”, which you can find:
on the tab “More”, under the option “Become a Premium user”.
on the Smart and Navigate tabs when the evaluation period has expired.
The actual price in your local currency will be displayed in myTifi. Press the button and please follow all instructions on your device. You have to log in with your iTunes account. Once the purchase is successful, all limitations will be removed instantly.
Get Premium features on multiple devices after a single purchase
Once you have become a Premium user, you can get all Premium features for freeon your other devices. Note that these devices must be registered to the same iTunes account that you used to make the purchase. For instructions, see the next section.
Restore the Premium features (free of charge)
When you have uninstalled myTifi from your iOS device, or bought a new iOS device, myTifi will behave as the standard version. Since version 2.16.6 we also store this purchase in iCloud, to automatically restore the Premium features. If you don’t’ have an iCloud account, you can easily, and more importantly without any cost, restore the Premium features.
To restore the Premium features, you need to press the button “Restore”, which you can find:
on the tab “More”, under the option “Become a Premium user”.
on the Smart and Navigate tabs when the evaluation period has expired.
Press the button and please follow all instructions on your device. You have to log in with your iTunes account. Noadditional purchase is billed to your iTunes account. Once the restore is successful, all limitations will be removed instantly.
myTifi might show the message that the App Store has no purchase history for this Apple ID. Ensure that you use the same Apple ID as during your original purchase. You can switch your Apple ID in the iOS Settings app. You can review your purchase history with iTunes on your PC or Mac, as instructed by Apple: https://support.apple.com/HT204088.
Apple Family Sharing
Becoming a Premium user is done via an Apple In-App Purchase. Apple Family Sharing doesn’t support Apple In-App Purchases. However, the following instructions allow you to become a Premium user for free on your Family Sharing devices:
Indicate the master iTunes account that has been used to purchase the Premium features.
Take any other iOS device that is part of the same Family Sharing account.
On that device, log out of the App Store (iOS Settings app -> App Store -> log out). Do not log out of the Family Sharing account.
Launch myTifi on this device.
Follow the normal instructions, but when iTunes credentials are requested, enter those of the master iTunes account from step 1. This should unlock the full version.
Don’t forget to log out the master iTunes account from the App Store afterwards (iOS Settings app -> App Store -> log out).
Repeat this for all other devices within the same Family Sharing account.
TV is connected via Wifi or LAN cable and you completed the Network setup in the TV menu
TV is running the latest firmware
TV has been connected once to myTifi
router has enabled UPnP feature
myTifi detects if your TV supports this feature and then adds it to the TV Manager.
Earlier TV Series These have a hardware limitation and can’t be switched on. myTifi controls your TV via the network, not infrared. When the TV is in standby, the network interface (via LAN and Wifi) of the TV is disabled. Therefor it’s not possible to communicate with the TV and send the command to switch it on. You have to use your original Samsung infrared remote control to switch the TV on (or use a similar device, like a Logitech Harmony universal remote). Then the network interface will be powered, allowing myTifi to control your TV.
Can I use myTifi over a VPN connection?
Yes, you can control your TV via a mobile 3G/4G connection, by using a VPN connection to your home network:
You have to configure the IP address and Series of your TV manually in the Settings of my TV. Rational: The automatic UPnP device discovery uses multicast, which is not supported by the VPN protocol.
On the same Settings page, you have to enable the switch to support VPN. This will disable the standard check for Wifi, so you can run myTifi with a 3G/4G connection.
You have to configure your router for VPN. We have used OpenVPN and PPTP.
Install the OpenVPN client on your iOS device, or configure the PPTP setup in the iOS VPN Settings.
Start the VPN connection. When it is connected, launch myTifi and let is connect to your TV.
I don’t have the original TV remote to approve myTifi
To prevent unauthorised control of your TV, Samsung requires you to allow each mobile device once. A confirmation popup is shown, where the button “Allow” needs to be selected with the original Samsung remote. When you don’t have the original remote, it’s possible to do this with the control buttons on the TV itself. It depends on the model Series where they are located:
C- and D-Series: There were touch buttons on the bezel itself, often in the lower right corner.
E- till J-Series: They have a jog control at the back panel, see the Samsung documentation.
K-Series and higher: The red LED light at the bottom of the panel is also a button. You can press this upwards to show an onscreen menu on the TV.
Custom URL scheme
A custom URL can be used to control an App from another App. The following custom URL scheme is implemented in myTifi: